My walk with Javascript is very brief. Like most people, after learning the good old Vanilla, I looked for a framework that could help me develop more complex applications in a more agile way.
After some research, I found the famous Angular from Google that had a somewhat new proposal…the known today, Two Way Data Binding!
Table of contents
Open Table of contents
Hmm, but what is Two Way Data Binding?
Two-Way Data Binding might seem a little confusing at first, for those who are used to the way Vanilla or JQuery takes data from Javascript to DOM and from DOM to Javascript.
Well, the main proposal of Two Way Data Binding is to automate this data traffic, in such a way that the developer no longer needs to create handlers in the DOM to update the Javascript and vice versa. So, when a value in the DOM changes, the Javascript responsible for that DOM will also be updated with the respective value automatically without needing to add any handler, for example:
<input onkeyup="”onChange”" />window.onChange = function (event) {};Sounds complicated, right? But it’s actually quite simple to implement. :)
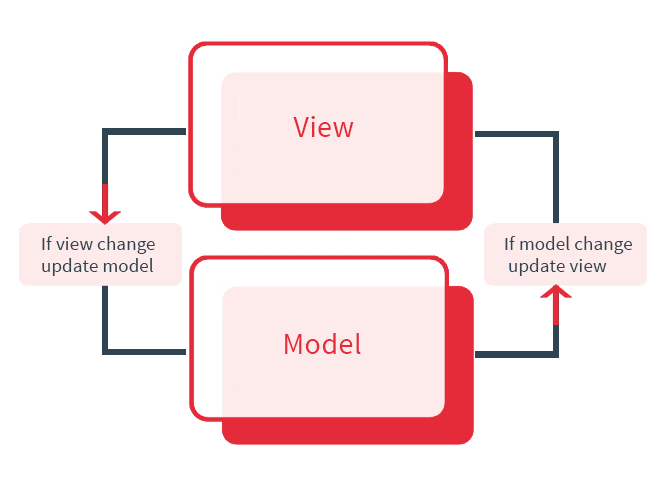
The image below is a flowchart of how the data update logic works with Two Way Data Binding:

The image above mentions two keywords: View and Model.
In this scope, View would be the DOM and Model would be the Javascript responsible for controlling the flow of data to the DOM.
Cool, but what about the code? Where?
After this brief introduction to the concept of this technology, it’s time to implement our own Two Way Data Binding! Let’s code!
Create an HTML file with the following content:
<input my-input="”name”" />As you can see the my-input attribute is a custom attribute and will be used to manipulate the input values when we type something in the input field.
Add the script tag below the input field as we are going to add our js code inside them (this is bad practice so don’t do this in the real world).
Inside the script, tag, it will be necessary to search for the element that contains the my-input attribute so that we can “listen” to the values that are passed to this element. Add the following Javascript:
var model = {};

var input = document.querySelector('\[my-input\]');

var modelProperty = input.getAttribute('my-input');

input.addEventListener('keyup', function (e) {
    model\[modelProperty\] = e.target.value;
});
The code above just searches for the element that contains the my-input attribute and after retrieving its reference, it takes the value that the attribute contains, which in this case is the value “name” (as we put it in the HTML). This “name” value will be the property that will be modified in the model, which as we can see in the Javascript above…is just an Object.
We will use the keyup event to update the model in real-time.
Cool, but how to reflect Model changes in the DOM?
When I was developing my own Two Way Data Binding, I spent some time reflecting on this part.
After all, how to make the model know when to update the DOM?
After a while of researching, I decided to use Javascript’s watch which worked very well for this need!
Now that we know what to use to implement this need, let’s get down to business!
Add just below the element that contains the my-input, a new element containing the attribute my-output.
<span my-output="name"></span>The my-output attribute will be responsible for reflecting the changes made to the Model’s “name” property in the DOM.
Now we need to add the Javascript code responsible for watching the model and changing the DOM when something changes.
var output = document.querySelector("[my-output]");

var modelProperty = output.getAttribute("my-output");

model.watch(modelProperty, function (prop, oldValue, value) {
  output.innerHTML = value;
});
As you can see in the code above, the only thing that has changed is the use of the watch method, which will run the callback each time the Model’s “name” property changes its value.
Now every time you type something in the element containing the my-input attribute, the same value will be reflected in the HTML of the element containing the my-output attribute!
That’s it?!
Yes, it really is quite simple to implement a Two Way Data Binding. Of course, this code created can be improved a lot! But the focus here is to keep it simple for the general understanding of how things work.
My Github contains the repository with this simplified and refactored tutorial in case it is useful for something.
Recommend this to someone else if you liked it. It’s always good to share knowledge!
Thank you very much and that’s it for today :)